Lots of makeover ideas
Paint it Black
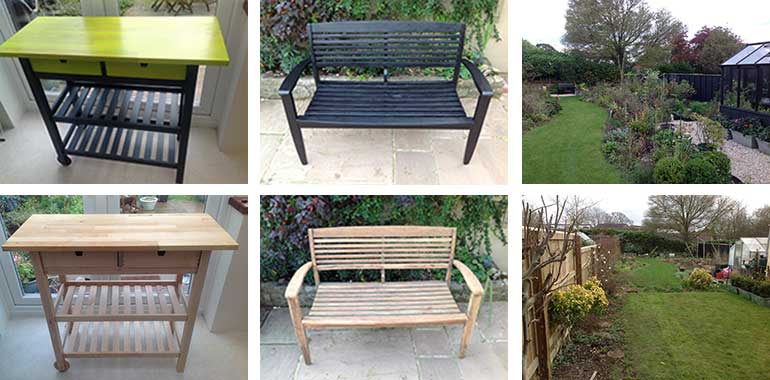
A Scandinavian’ kitchen bench transformed in to a potting bench with 1 coat of Royal Lime Green + 2 coats of Clear on the top for a lovely translucent stain finish. Frame treated with 2 coats of Royal Exterior Black to complete the stunning new look. An old bench was sanded down and painted with 2 coats of Royal Exterior. New greenhouse & old fence - 2 coats of Wood Stain & Protector.
Garden looking after the glorious transformation!
Charmouth Beach Huts
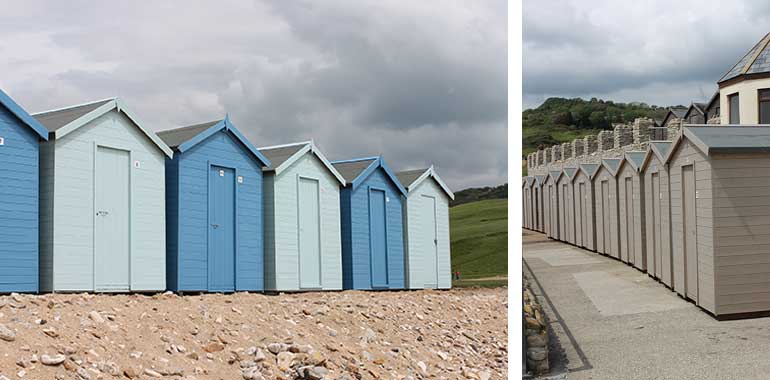
A row of beach huts looking out to sea are given an attractive protective coating of Royal Exterior in Eggshell Blue and Somerset Blue, beautifully reflecting the hues of sea & sky.
On a stretch of the beach renowned for fossil hunting, a strip of new beach huts were erected by Beaminster Sheds treated in Protek’s Royal Exterior Soft Mocha sitting naturally within the coastal defences.
How to Maintain Window Frames
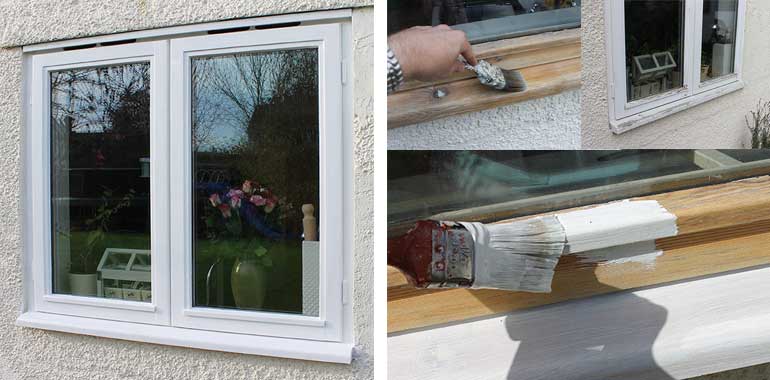
The paintwork on these window frames was cracked, peeling and flaking off leaving an unsightly mess and un-protected timber. As the paint work had deteriorated so badly the only choice was to strip it all back and start afresh.
Step 1
The beginning - sand off the old paint coating. A power sander was used but alternatively you could use a blow torch and scraper. A final sand by hand with fine sandpaper then a brush down to remove loose debris and frames were ready for Protek Wood Preserver to be applied. Two coats of Wood Preserver were painted on to provide long-lasting protection against rot, wood destroying and wood discoursing fungi (blue stain). Once dry the Wood Preserver also acts as a base coat providing an adhesive surface for further subsequent treatment with finishing paints or wood stains.
Step 2
Apply a water-proofing top coat. Protek Royal Exterior wood stain in Snow was chosen to protect the wood from the weather elements. Royal leaves a natural-looking matt coating that is semi-opaque allowing the wood grain to show through. Two coats later and the window frames were fully protected and looking lovely. The coating should last 3-5 years before a maintenance coat is required.
Front Door
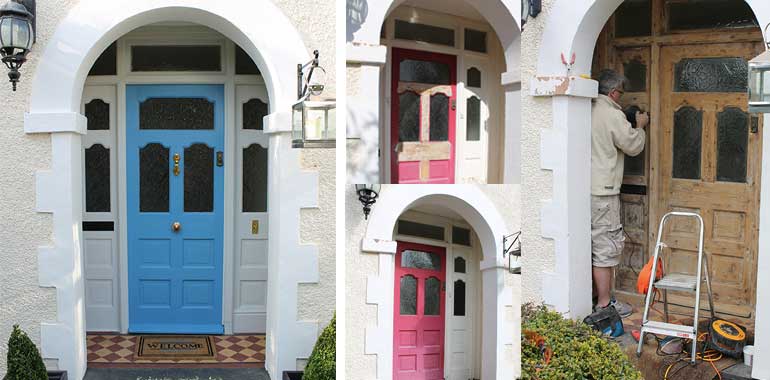
Front door and surrounding wood panelling in need of maintenance. Old paint work has badly faded and is peeling and cracking. Bottom of the door frame in need of repair with bad wood taken out and filled.
Years of old paint is removed using a combination of a chemical paint stripper and heat gun. Door and panelling is sanded down to bare wood. Knotting Agent applied to a couple of knots that still look quite resinous to avoid any possible resin bleed staining the new coating. The first coat of Protek Royal Exterior Superior Wood Finish is applied to the bare timber.
Royal Exterior Somerset Blue is applied by brush to the door with China Clay in contrast on the wood pannelling & frames. Two coats produces a hard-wearing water repellent coating that allows the wood grain to show through.
The transformation is complete! A faded shabby doorway is transformed in to a beautiful and elegant entrance that will look good for years.

Garden Chair
An old garden chair made of bamboo cane strips was very neglected and in need of a facelift. After a good sanding down with medium sandpaper to remove old dirt & algae it was time for the transformation to begin.
I wanted to create a fun beach style chair so used sample pots of every blue within the Protek Royal Exterior range. With my trusty assistant and the sun shining the painting fun commenced.
Colours used from top to bottom; Midnight Blue, Heritage Blue, Iris Blue, Teal, Eggshell Blue, Porcelain Blue, Mendip Mist, Somerset Blue, Ice Blue. Seat section from top to bottom; Midnight Blue, Eggshell Blue, Heritage Blue, Mendip Mist, Porcelain Blue, Ice Blue, Teal.
Two coats of Royal Exterior Wood Finish was ap- plied in alternating stripes to create a fun and attractive chair, and with the sun still shining I was ready to sit back relax and admire the garden.
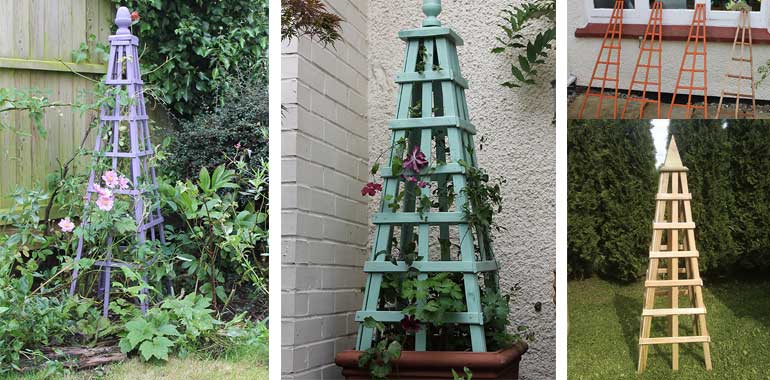
Garden Obelisk
At the back of an old workshop lay the remains of a trellis obelisk bought many years ago. Only 3 sides remained of one that had been painted orange, propped next to a spare untreated section. The sections were washed thoroughly and left out in the sun to dry before applying wood stain to them.
To overcoat the dark orange colour from the previous treatment, three coats of Royal Exterior Lavender were applied to the trellis segments. An acorn was bought from a hardware store to top off the structure and painted in French Lilac to blend in with the rest of the obelisk.
This gorgeous Scafell Pike Obelisk was bought from Zest 4 Leisure to support the growth of a couple of Clematis climbers and brighten up a dull corner of the garden where two walls meet. Being made of pressurised timber I didn’t need to worry about preserving it and wanted to apply Royal Exterior Wood Finish to make it last longer and give it a fresh, vibrant look. Spring Green was chosen to compliment the burgandy wine coloured flowers of the Clematis.
The top section of the obelisk was replaced with an acorn to give it a softer country cottage feel & to match the obelisk above. Two dull and drab corners of the garden were instantly brightened up with soft planting and pretty colours that will give all year round colour.
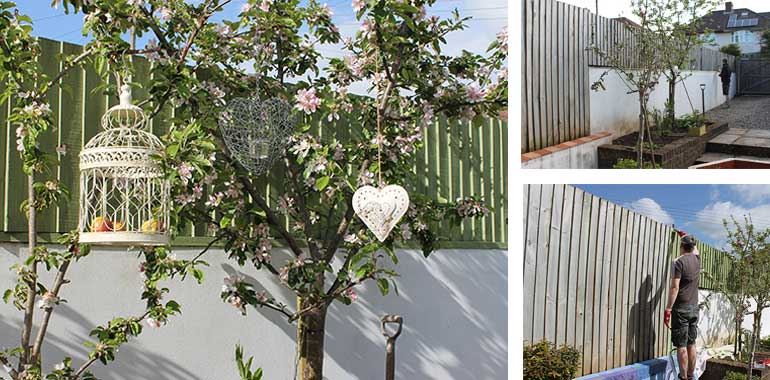
Pale Sage Fence
The old fence was checked over and repairs made to loose panels. All dirt and algae was removed with a wire brush and soapy water. Once the panels were fully dry, a single coat of wood stain was applied.
One coat of Wood Stain & Protector in Pale Sage was applied leaving a light natural looking stain effect with the grain of the timber showing through. For fencing only one coat is required to create a water-repellent coating with a maintenance coat every 2 - 5 years depending on levels of wear & tear and exposure to the elements.
Apple blossom looking beautiful in the spring, after the blossom the fence still looks lovely.
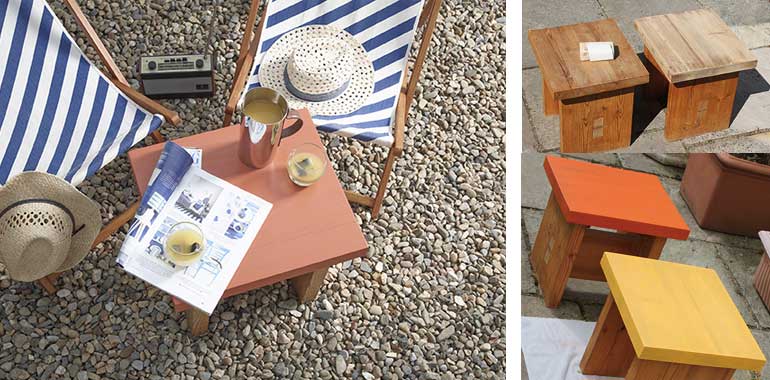
Stools
Two old pine kitchen table stools had seen better days and were looking stained, faded and a bit ugly. Prep was easy as all I had to do was lightly sand down the surfaces that I wanted to paint so within a few minutes I was ready to go.
I wanted to give them a fresh look leaving the legs their natural colour and painting the tops in Royal Exterior wood finish. I chose Drawing Room Gold and Saffron to give them a fresh and enticing, fun feel. After one coat I liked the look but decided to apply a second coat to increase the depth of colour.
These shabby old stools are now transformed in to chic, modern pieces of furniture with bright, fresh colours. They look gorgeous being used outside as side tables for a spot of relaxation in the sunshine and look equally lovely inside the house.
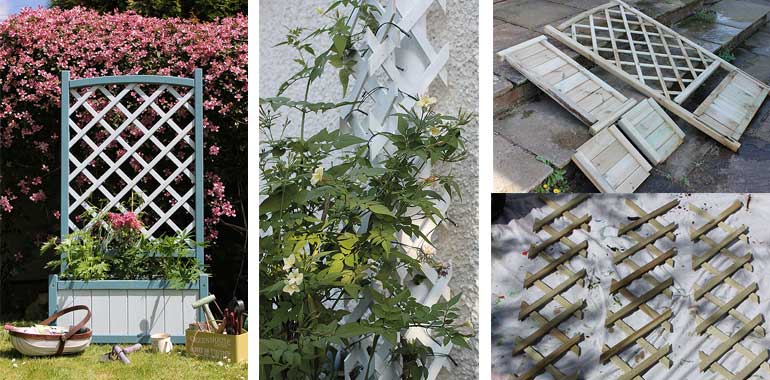
Pipe Trellis & Cambridge
This Cambridge Planter made by Zest 4 Leisure comes pre-treated with preservative chemicals. Normally they advise weathering for 3-6 months to allow chemicals to expire out but I wanted to paint it straight away so just scrubbed off the chemical residue from all surfaces with soapy water plus a light sand when required, and left to dry.
I used a combination of Royal Exterior Heritage Blue on the frames and side panels with Ice Blue on the trellis and front panel to create a beautiful contrast. This gave the planter a country cottage feel that wonderfully compliments planting and provides year round colour.
I wanted to hide an ugly drainpipe so sourced a pipe trellis from Zest 4 Leisure. To blend it in with the wall I painted the trellis sections white. Half were painted with Royal Exterior Snow that gave a quicker solid coating and the other treated with Wood Stain and Protector in Whitewash that also produced a lovely finish. And now my drain pipe looks amazing throughout the seasons with just a little effort and using less than 1 litre of wood stain!
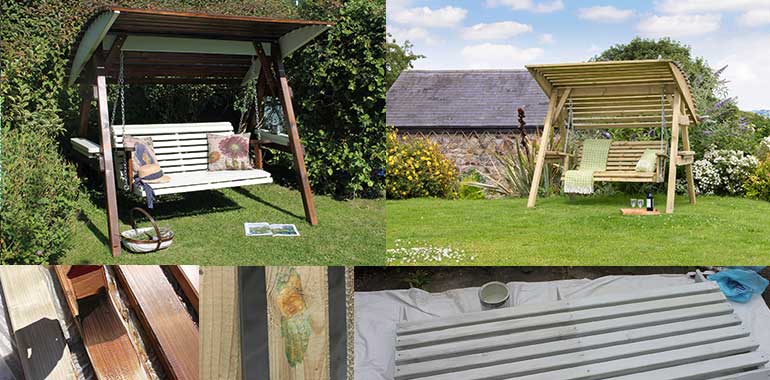
Miami Swing Seat
This amazing swing seat came from Zest 4 Leisure. It’s made from pressure-treated softwood so the timber is protected against rot but not from damaging effects of moisture and the elements.
Zest recommend that their products are left to weather for one moth before treating with a protective top coat but we wanted to paint it slightly sooner than that.
We thoroughly scrubbed the timber with a brush and soapy water to remove the green salty residues, resin and dirt from our garage. It was then left to dry thoroughly in the sun before further treatment.
We wanted to give the piece a traditional country feel so decided to paint it in Royal Exterior Taupe and Oak. As Taupe is a light colour we first applied a stain-blocking primer to prevent tanin stains and resin bleed on the coating. When the primer dried we applied two coats of Taupe.
On the Oak sections resin and tanin stains wouldn’t be so evident meaning that we could just paint the Royal Exterior Oak straight onto the timber. Two coats is all that is needed to colour and protect the timber against the elements and produces a hard-wearing water-repellent coating that will keep the swing seat looking great for years to come.
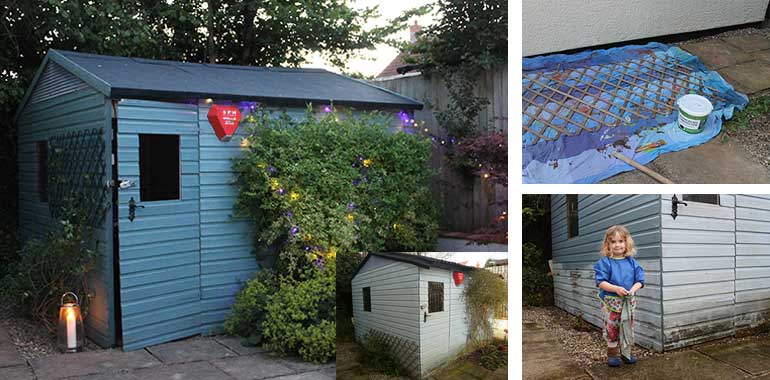
Bike Shed Makeover
The old coating on this shed had badly weathered and worn away. Dirt and algae covered the boards above the flower bed and it was in desperate need of some tlc.
After experimenting with a sample pot I selected Protek Wood Stain & Protector in Beaumont Blue to overcoat the old coating.
My helper and I thoroughly washed and scrubbed the shed with water and detergent ensuring that all of the algae and loose bits of paint were removed.
We applied three coats as we were over-coating a strong previous colour and I like the solidity and depth of colour that three coats produces. Two coats would of been fine though and provided a good water-resistant coating.
The shed looked so much better already but needed a new roof and finishing touches. We scrubbed down the old trellis with a stiff brush and left it to dry before applying a single coat of Protek Wood Stain & Protector in Peacock Blue.
A new roof was constructed with sheets of marine ply and painted with Texture Roofing Paint in Midnight Blue. Two coats were applied undercover prior to construction with strips in place on the outside of the roof to seal the joints.
Finally the eye sore of a shed was transformed into a beautiful structure that created a pleasing and attractive backdrop for entertaining in the new garden and background for the planting scheme.
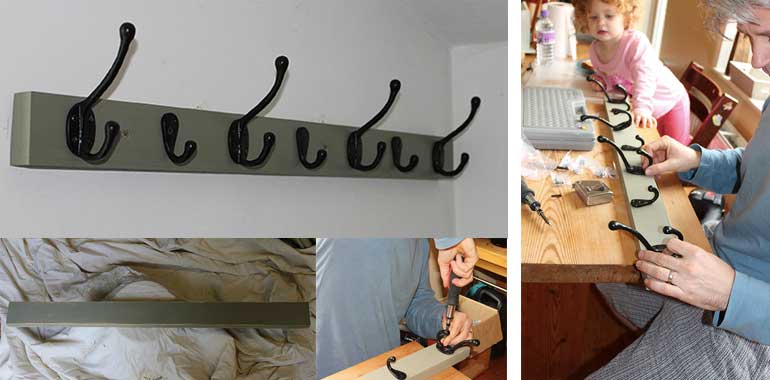
How to Make a Coat Rack
My husband found some old planks of wood in the garage and measured the length that we wanted the coat rack to be. The bits of wood were a bit thin so he cut two sections too length and glued them together using a hard, quick bonding glue. He then painted on two coats of Protek Royal Interior Mushroom wood stain.
The hooks were purchased for a couple of pounds from our local high street DIY shop. Next he enlisted a trusty assistant to help place the coat hooks on the wood and mark off the holes. Once all the holes were drilled he screwed the hooks in place along the length of the wood.
And voila! Within the space of a couple of hours a great looking coat rack was adorning our walls for a minimum of cost and effort.
This is the perfect project for any novice to carry out at home and a sample pot will give you enough wood stain, or a 1 litre tin will provide ample with plenty left over for touch ups and other projects inside and out.

Teak Garden Furniture
My teak garden furniture table and chairs set had never been treated with anything and after more than 10 years of exposure to rain, sun and general muck they were looking dirty, tired and old. Firstly we cleaned them using a power washer to strip off all of the dirt and algae then left to dry fully. ower washers are very effective at blasting off dirt and old coatings but they also create furring and splinters on the timber. When the timber is fully dry a light sand is required to remove splinters and create a good surface to paint on to. I couldn’t decide between colours so applied the two choices from sample tins to a strip underneath the chair s where it wouldn’t notice. This meant that if I had decided to go with the lighter Hazelnut shade the darker Walnut stain wouldn’t show through.
All 4 chairs, the table top and legs were given a light sand. It was a cold wet winter so all of it was brought inside a garage for treatment. Being teak (hardwood) I used Royal Exterior as it is designed for hardwood and is best suited for use on garden furniture. I chose the Walnut wood stain as felt it better suited the darker original hardwood and I loved the colour! After only 1 coat of Royal Exterior wood stain there is a gorgeous golden wood tone to the table top. You can just apply one coat of a coloured wood stain and use one to two coats of Royal Exterior Clear to protect the coloured coating and provide full water-repellency and protection against the elements. The chairs were turned upside down to ensure that the Royal treatment was applied to all parts of the timber sealing it against moisture penetration.
After 2 coats were applied you can still see the wood grain showing through. The Walnut colour looks rich and beautiful with a warm golden tone and my very old garden furniture is transformed in to a beautiful set that looks brand new again and will last for many more years! And now time to put it back in the garden to enjoy using it again and look forward to the warm summer months where the mug of tea and garden tools can be replaced by an evening meal and nice glass of wine!
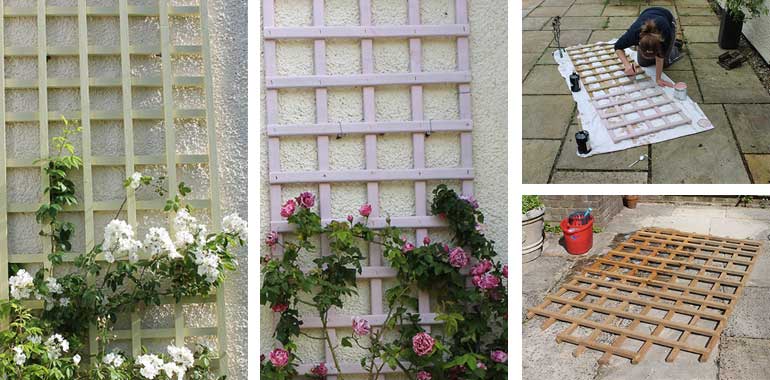
Trellis
Wash down, leave to dry fully & remove any loose splinters. Use a good quality 1” or 1.5” paint brush and apply 1-2 coats of wood stain.
Decorating a trellis can be a time-consuming job but it’s definitely worth the effort.
A small amount of coloured woodstain from Protek’s Royal Exterior or Wood Stain & Protector ranges can transform a dull looking trellis in to a thing of beauty that supports and creates a backdrop to plants and flowers as part of a stunning display.
APPLICATION
Start at the top of the trellis painting the external & internal sections first then finish with a coat on the top struts brushing out any drips along the way.
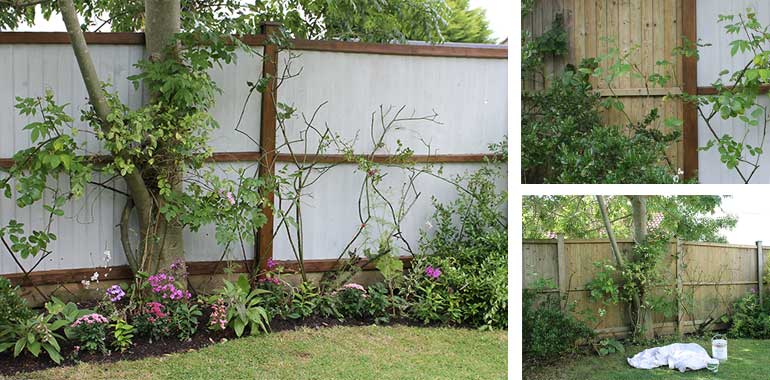
Garden Fence
The boundary fencing hadn’t been treated since erection. The natural timber colour had weathered & the panels covered in dirt & algae. The dirt & algae were removed with a pressure washer stripping the timber back to a clean surface. Once fully dried, woodstains were applied for decorative colour and protection against the weather. The 1st coat of Wood Stain & Protector in Warm Stone soaked in beautifully leaving an instant block of colour.
Mature rose bushes were covered for protection from thorns and the 1st coat left to dry before a final 2nd applied. Posts and frames were painted with Royal Exterior in Hazelnut to contrast with the light colour of the wood stain on the panels, creating a dramatic background to planting.
Now the fence panels were looking so good it was time for some hard digging before the fun planting could begin.

Mini Makeovers
Even in the depths of winter you can add colour and life to your garden with a small splash of Protek woodstain. All of these makeovers were carried out just using a sample pot of the coloured wood stain and took less than 30 minutes in total to complete each one.
Mini greenhouse painted in Royal Exterior Warm Clay. Old wooden star mobile lightly sanded and painted with 2 coats of Royal Exterior in Midnight Blue, now twinkling brightly
in the tree
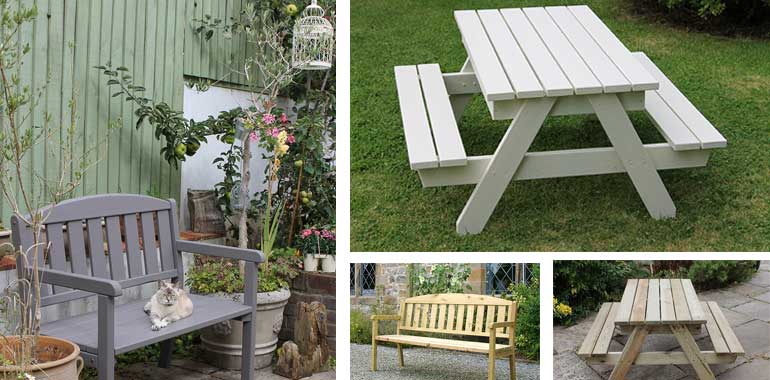
Garden Furniture
I loved the style of this new garden bench but wanted to protect it from the weather. I selected Royal Exterior in Dove Grey to offer fantastic long-term protection and a colour to tone in with this section of my garden. After no prep & just 2 coats it is now an attractive seating area for the whole family to enjoy!
Caroline Bench from Zest 4 Leisure
I wanted to make this new softwood picnic table look prettier and as it will be sitting outside with the weather beating down on it plus rain water sitting on it, I wanted to add a protective coating. Royal Exterior is a hard-wearing water-repelling coloured wood stain coating that is perfect for the job. Being brand new no prep was needed and only two coats of Royal Exterior Cornish Cream required to offer full long-term protection and transform it in to a lovely piece of garden furniture.
Alice Children’s Picnic Table from Zest 4 Leisure
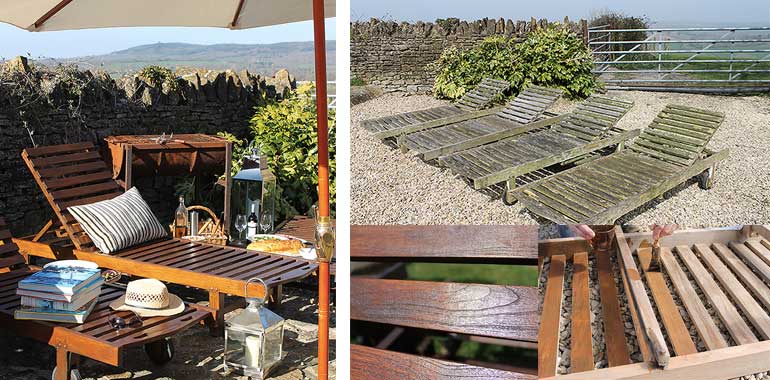
Sun Loungers
A set of untreated hardwood sun loungers was suffering from weathering, UV fade and algae growth. This once attractive and expensive set of furniture had become an eyesore and was in desperate need of some love and attention.
The timber was stripped back using an industrial powered pressure washer then the remaining algae killed and re- moved by painting on a solution of water and bleach. Once dry the timber was ready for a protective wood stain to be applied.
Royal Exterior in Hazelnut was applied to leave a superbly rich colour with a natural looking finish that allows grain to shine. Some elbow grease and two coats of Royal Exterior was all that was needed to transform this set of sun loungers in to beautiful pieces of furniture that set the scene for partying, picnicing, relaxation and fun.
The hard-wearing, attractive water-repellent coating is set to protect the loungers for many years of enjoyment.
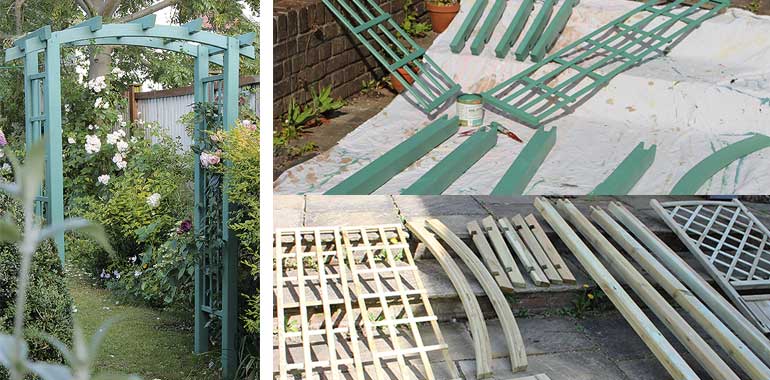
Moonlight Arch
A section of the garden needed an arch to provide both architectural interest, beauty and support to climbers. The Moonlight Arch from Zest 4 Leisure is a lovely design but I wanted to paint it a colour for attractive protection. The timber is pressure-treated and they advise to allow it to weather before treating but I sped up the process by scrubbing the timber with soapy water to remove any treatment residues and dirt, then left to dry in the sun.
Once dry I painted on two coats of Royal Exterior in Meadow Green. I didn’t use any knotting agent or primer so it may be that resinous knots might bleed out but if they look unsightly I can just touch up areas if need be. When the Royal coating was dry we constructed the arch in a more spacious part of the garden where it looked very pretty against the pink showers of the Montana Clematis.
Holes were dug in the ground for the posts to be dropped into and quick-setting Postcrete used to secure the arch posts in place. Once it had set some of the sections of turf that were removed when the holes were dug was placed on top to make the posts look like they were coming out of the lawn. The Meadow Green colour works wonderfully with the planting scheme and will extend the life of this beautiful garden arch.